BLOG PAGES

Showing posts with label android tutorial. Show all posts

Sunday, 17 November 2013

How to Transfer Large Files in Short Time

In android phone with tethering between two phones you
can send 500 mb Application in 1 mins beacause tethering has
more speed then bluetooth connection
HOW TO USE FILEHSHARE
The two phones must have this application before using it. .
And the application dont use bluetooth connection

First download flash share from this link
http://m.sharemobile.ro/file/714467

2 . Install and launch the application , create your username
and add your picture to it, thesame with your partner
3 . Now Click “ CONNECT WITH FRIENDS ” option on the Home
screen of the flash transfer application in both / all devices .
4 . ClickCREATE CONNECTIONin the Senders / partner device
and click SCAN TO JOINin the Receivers device .
5 . Sender’ s device will be waiting for a connection to be
created after the Receiver joins his / her connection .
6 . Now Wait for the Receivers device to establish the
connection which will take fee sec .
7 . A successful connection will show the name of both the
Sender and Receiver AVATAR icons on the top left corner of
each device . just the way you see me at my screenshot picture
8 . Slide option is only valid for transferring image files . To
transfer an Image , go to Image tab and long press the image
that has to be transferred.
9 . An option ribbon will appear with 4 commands. Click on
SLIDE option to Share the Image . Sender can also share by
clicking on SHARE option on the ribbon.
10 . On Clicking the SLIDE option , the image will open in the
sender ’ s device. Slide the Image from Left to Right and the
Image will start sliding into the receiver’ s device.
11 . On Sliding out the Image from the Senders device, the
same will Slide in to the Receivers device .
12 . Another option to share or transfer multiple Images is
SHAKE .
13 . Select the desired image files in the Senders device and
SHAKE the handset .
14 . Within seconds , the Images are transferred to the
receiver ’ s device. Similarly , other files can also be
transferred with a SHAKE .
15 . All the shared files will reflect under the History Tab .
16 . After the whole process , don ’ t forget to turn off WIFI
connection to save battery consumption .

HOW TO INSTALL PES 2012 ON YOUR ANDROID PHONE

Hello my fellow 9 jabazite members , where are the pes
gurus ? In PeS I have Mentors , however Iam known in the
Game , even In ma Crib . If i can remember PES was my best
game because it make you to think like your are footballer,
Who is not familiar
with the PES , or better known as Winning Eleven ? PES is the
next generation of Winning Eleven football game made by
Konami famous first through the Playstation platform . PES is
now available for all platforms , namely Nintendo , Wii, Xbox
360 , and PC . PES is now venturing into the smartphone , and
is available in the iOS version , Symbian , Android and Bada .
Many other games, such as Real Football from Gameloft and
EA FIFA , but PES is still the game of football too . And the
latest version of the game is PES 2013 . HOW CAN I RUN PES
2012 ON ANDROID ? just follow the below steps , pls adhere
strictly . Attachments DOWNLOAD PES 2012 APK FROM
sharemobile . ro . Or our downloading portal DOWNLOAD PES
2012 DATA WhAT NEXT? 1 . Extract the sd card files first by
using File manager or xplore or unzipper or B1 Free Archiver
zip rar unzip to ANDROID FOLDER 2 . Then insert it into
DATA FOLDER 3 . Lastly install your Pes 2012 . apk that you
downloaded already And Enjoy the game . NOTE ; If you have
any problem on running the game , just comment , either me
or any Member can Assist, its an Open forum jare. PLS
SHARE THIS WITH UR FRNDS

Thursday, 24 October 2013

How To Install Unsupported App On Android Device

Hello guys, I know majority of Android and iPhone users are now
rocking the hell out of BBM with this new BBM app installed on
their device. Though RIM official said BBM will properly be available
for other Android Phones by 25th of this month but a lot just can’t
wait.
If you are finding it difficult to download BBM for your Android
Phone, you can download it From this two link below :
Link 1 BBM Download
Link 2 BBM Download
Mind you, to successfully install BBM on your Android phone, you
must have atleast OS 4.0 and above if not you might be considering
an upgrade for some supported Android phones. Despite the fact
that some android device meet up with specifications above, they
still find it difficult to install BBM or some app on their device as
they will always get unsupported.
I’ll quickly show you how you can install unsupported app on your
Android device with ease.

How Can I Install Unsupported App On My Android Device?
===>Make sure you have a root access on your Android Device
===> Market Helper is a tool for Android that helps users to be able
to change/fake their rooted devices to any other devices. For
example, it can turn your Nexus 7 into Samsung Galaxy S3 in a
few seconds. No reboot is required. You can download Market
Helper here or from dropbox here
How To Make Use of Market Helper (Tested on Nexus 7 &
Galaxy S3 running JellyBean 4.1.2)
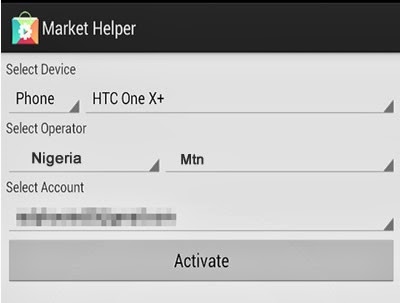
1. Run and install the app
2. Open the app. Select the device and carrier you want to change
to

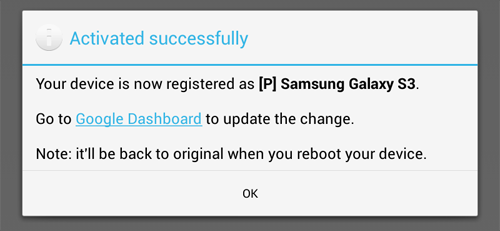
3. Press Activate . Wait until it’s done

4. Go to Google Dashboard to update the change ( just visit the
page, you don’t need to do anything )
5. Now you can download and install apps that you couldn’t before.
If you want to switch back to normal, select “Restore” in device list
and press “Activate”, or simply reboot the device ( with wifi/3g is
enabled )
Supported Device
Android 2.2+ devices with Android Market / Google Play Store +
Google Services Framework installed

HOW TO ROOT YOUR TECNO P3 AND N3 PHONE

This tutorial will tell you how to root your tecno N3 and tecno P3
first of all rooting of phone is the same like hacking phone,On July 26
2006 united state library of congress made a decision that really
pissed off the android factory they essentially said that it was
legally for smartphone owner to hack their smart phones so that they
can install whatever they want on it, so what is the significant of
rooting a phone wow it let you have complete access of your phone
and let u install programs that your phone company and
manufacture generally wont allow,so when you root android you can
install your own programs,themes,fonts.and you can remove those
unuse application your phone manufacture put on it,before will
continue just know that this will ruined your phone warrantty it work
for some

What you need to know or do before start

1 Your full internet access
2 Enable USB debugging
3 Change location of your install app to phone memory
4 Enable development and Allow mock location
5 Make sure you still have 80% battery percentage
6 To Download poot here

STEP TO ROOT
install this POOT apk to internal memory and open it,it will display
This application requires Ministro service cilck ok .it will transfer you
to your google play store to download Ministro II library
it will display error just update through the playstore or through the
apk file you have download the poot
So after installing and updating all the library of QT which is like
(11MB) your phone will automatically reboot if not dont open the
poot cos IF you open it and click press here to poot,your phone will
vibrate and automatically off and it can be ON back until you
remove your battery
and you are not allow to restart or reboot your N3 and P3 until you
root it,SO just turn your phone off and on So as soon as your
sdcard is preparing quickly run poot
IT WILL DISPLAY TWO BUTTONS

1 "press here to poot"
2 "built in root check"
Cilck on the first button "press here to poot" and wait till you get
the 3 buttons (
Get superuser, Get Root checker and in buitl root checker) so cilck
to download the superuser and the root checker on play store cos
without it your phone is not yet root,,so if you have downloaded it
that's means your phone as now been rooted
IF you get demon materialized when you click on "press here to
poot"
all you need is to keep trying,
Comment if you have any problems rooting your phone

How to Format Tecno N3,P3 L3 Android Phones

1. Switch of the phone first.
2. Press and hold the Power key and the
Volume Up key at the same time and wait until
you see a Menu appear on the screen before
you release it.
3. On the Menu, you will see an option that
shows DATA WIPE/FACTORY RESET.
4. Use the volume keys to scroll down and
select the DATA WIPE/FACTORY RESET with the
Power key.
5. Another Menu option will appear and you
will see a series of No's arranged vertically so
scroll down with the help of your volume key
and find DELETE ALL USER DATA .
6. Then use the Power key to select it and wait
for the process to finish.
7. When it is done, you will be taken to the
first Menu then scroll to REBOOT PHONE
NOW and use the Power Key to Select the
option and wait for your phone to REBOOT.
Congratulations! if you follow the steps
correctly, your tecno android phone will now
be restored to factory settings.
NB: Make sure you understand this steps very
well before you decide to format your device.
Also note that all your data will be gone.

Monday, 21 October 2013

Format or unlock a password/pattern locked Android phone

Do you you want to format your Android phone using
the hard reset method?
Some of the things that will make you format your
device this way includes:
1. If the device owner forgot the unlock pattern or pin
of his/her Android phone.
Once you forget this code, you cannot access the
contents of your device unless the unlock screen
gets out of the way. The last recommended
solution to this is to wipe the data of your phone
without accessing the menu. Note that this will
erase all your personal files, info and apps in the
phone storage. You will only
regain this if you earlier on backed up your phone
on your local drive or Google account. This
procedure will leave your SD card untouched.

How to unlock Android device Pattern/Pin
3. If you want to free system memory.
Formatting of device and a manual reinstallation of
apps will remarkably yield free memory for use.
4. Restore phone to factory setting.
This is needful if you want to sell your phone or if
a change in a system file made your phone to
malfunction.
HOW TO FORMAT/HARD RESET A LOCKED ANDROID
PHONE.
Its simple. Many Android phone makers gives a specific
guideline on this but in the absence of such, generally
you:
1. Switch off the device
2. Hold the POWER key together with at least the down
volume key to power the phone and start the resetting
process.
3. A command-like window with sometimes a green text
appears
4. Use the up/down arrow key to scroll screen and use
the Power key to select.
5. Select WIPE DATA and the phone reboots after some
few minutes to
Please do not forget to LIKE our Facebook™ page at the
left hand panel (PC) or at the bottom of this page
(Mobile)

Sunday, 20 October 2013

Free Download skype_ 1 .0 .0 . 538 for Android

Free Download skype_ 1 .0 .0 . 538 for Android
Name file : skype
Size : 8.5MB
Genre : Chatting,socia
Android : 2.3 and above
For All Android Phone
Tested And Working
-Download Skype Android click here to
Download

Thursday, 17 October 2013

How To Reduce High Data Consumption On Android Phone

1 . It’ s no news that Android device consume more bandwidth
than Blackberry device and I ’ ve been thinking endlessly why
this had to be so . A normal typical Blackberry user may not
be able to even consume 500 MB data per month while this
same 500 MB won ’ t be enough for Android user for two weeks ;
this alone keep them wondering in the state of
quandary . Those android users know what am talking about .
That is why I try as much as possible to look for the cheapest
way of surfing the net suitable for every mobile device.
This tutorial is typically for Android users and it’s going to
help you reduce high amount of data rate consumption on
your android phones .

2 . How Can I Reduce High Data Consumption On My Android
Phone ?
1 . Tap on the menu button on your screen .
2 . Navigate to " Settings" .
3 . Scroll down to " Account and sync settings"
4 . Deselect " Background data" . Ignore the warning and only
select background data when you want to use Google play
store .
Alternatively , for those whose Android phone consume
battery like well , you can visit google play and download ‘
juice defender
And finally , those who are making use of PD proxy VPN , you
can now surf the net using your etisalat sim with# 0 . 0 . I don ’ t
want to officially right a post on this because the connection
is very slow .
That ’ s
Share with your friends

how to run java apps & games on your andriod phones

some say andriod cant run java , lolz you
guys are funny well just look down below
you will find how to run Java apps
( J 2 ME- MIDP ) on Android Devices in this
article .
We will use Netmite App Runner , JBED ,
JBlend
and phoneME emulator to run Java Apps
on
Android . All of them might not work for
you
depends on your Device and ROM. But I
sure , one of them will be absolutely
working
for you , so please keep reading and try
these
apps out .
Netmite App Runner
Features
This is the most popular application to run
Java apps and games ( J 2 ME/ MIDP jar /
jad )
app on Android OS.
This application has App Explorer , which
helps to find existing Java apps and games
on your phone / tablet device.
It is integrated with Browser- Browse any
j 2 me site , click to run any jad/ jar file .
It can auto - convert J 2 ME into Android
package ( apk ) on the fly .
You can immediately port your existing
Java
apps ( jar / jad) to Android WITHOUT source
code .
Download
Download Current Release 2 . 0 . 3
Convert your existing Java/ J2 ME/ MIDP
( jar /
jad ) apps / games into apk from here By
Netmite .
Download already converted apk apps /
games from here By Netmite.
Installation
Download and Install the apk .
JBED
Features
JBED is also a very good Java / J 2 ME
Emulator
for Android.
It is fast but has some issue like screen
got hazy on landscape mode , unexpected
force close.
It has built in app explorer .
Download
Download JBED version 1 . 20 for Android
2 . 1 + ( not tested on Ice - cream Sandwich or
Jelly Bean) .
Installation
1 . Copy the JAR files on your sd card root
directory
2 . Download file and attached file and
unzip
it, you get Jbed . apk and libjbedvm . so
3 . Make sure that you have root access
( otherwise you could not get access to
system folders ) .
4 . Install Jbed . apk and push libjbedvm. so
to / system / lib and reboot your phone .
5 . Launch Java app . Press menu button
and choose SD Card . Wait a while and
choose jar apps to install .
6 . Now if you want to launch java apps ,
open Java app first and choose the
location where apps is installed . ( e . g . SD
Card folder at the top ) , click on the
installed java apps and run.
JBlend
Features
JBlend is very Similar to JBED and much
better . s smooth and never crashes .
Support most Java apps / games .
Download
Download JBlend for Android.
Installation
1 . Unpack the archive to your memory
card .
2 . Make sure that you have root access
( otherwise you could not get access to
system folders ) .
3 . Start the Root Explorer ( EStrongs File
Explorer does not work ) .
4 . Start the Root Explorer , select r / w from
top right corner and copy files to folders
as below - need more?

ALL ANDROID SECRET CODES

1 . Secret Codes of
Android mobile
phones :
Caution : Use all
these codes at your
own risk if you got
any type of damage
we will not be
responsible for that . General Codes of
Android mobile
phone . . . . .
AS A
PROFESSIONAL
PHONE
ENGINEER I WANNA drop
SME SECRET
CODES * # 06 # ¨ C Display ' s
IMEI number .
* 2767 * 3855 # ¨ C
This code will
Format your device
to factory state ( will delete
everything on phone ) .
* # * # 4636 # * # * ¨C
Display ' s Phone
information , usage
statistics and battery.
* # * # 273282 *255 * 663
¨ C This code will
Immediately backup . Remaininq loadinq

DOWNLOAD PAID APPS ON GOOGLE PLAY 4 FREE

This is just a little step to download a paid app from play store using 4shared OK , this is quite easy. . . Open play store , download
4shared . . . That all . . open 4 shared & register an
account . . . here ' s the trick , Open play store & search 4 any
paid app , e . g Next Launcher 3 D which costs about $
15 . 49 . . . Then open your installed 4shared , and search 4 exactly
The same app , i. e exactly d ' same name , download d latest apk
version and install, that all . . . . 2 make sure u downloaded d
right app , go back 2 playstore and search 4 d ' same app . . and
congrats , u ' ll see that u ' ve just got it 4 free. .

Root Android Phone Meaning Advantages And Disadvantages

Am pretty sure that every now and then you have come across
topics on the internet teaching and discussing on how to root
android phones , devices and other related topics, did you ever
wonder what it meant to root an android phone? Well, I too used to
imagine what it meant but I now got a better understanding to the
term and I want to share with you here.

Meaning Of Root Android Phone Or Device

Rooting an android phone or device is simply a process that allows
an android user to attain privileged control over his/her device.
When an android user root his android device, he gets access to all
system files on the device and also gives the user the ability to
change or perform certain operations on the device which normally
cannot be done.

Advantages Of Rooting Android Phones Or Device

There are basically lots of advantages to performing the above
function but am going to list just a few here.

1. Gain Full Control Over Your Android Device: Rooting your
android device will give you access to change the system files, boot
images and more on your device thus giving you full control.

2. Install Custom ROMS: Normally there are customs all over the
internet, ROMS that will entirely change your device thus giving it a
new look and feel. When you root your android device you get a
custom ROM and customize your device to your taste. You can even
choose to install ROM that will improve performance of your device,
speed and battery.

3. BackUP and Restore Your Entire System : Performing the
rooting process will also give you the opportunity to backup your
entire system on a memory card.

4. Update To Latest Android OS Version : When you root android
phone or device, it will allow you to update your device to the latest
version of android device Operating System(OS).

Disadvantage :

I really do not think there is an advantage without a disadvantage
and same is applicable to when you root your device, the major
disadvantage in performing the rooting process is the risk of
damaging your android phone or device. Yes you heard me right, if
you didn’t perform the rooting process properly, you run the risk of
causing demage to your phone or device. More so, due to improper
rooting, the device phone might over-cloak or under-cloak thus
leading to the device processor to over-heat and in some cases, the
device might explode, so I suggest you take precaution when rooting
your android device.
Hope this helps?
In my subsequent posts, I will be teaching on how to root most
android devices like the tecno N7 and more.

How To Root Tecno N7 Using SuperOneClick And Unlock Root Downloader

Following one of my posts where I had talked on advantages and
disadvantages based on rooting android phone, I recall promising to
post tips and tutorials on how to root some android phones based
on their models and here on this page, I just want to share with you
how to root tecno N7 mobile phone device using Superoneclick and
Unlock Root Downloader.
Usually, Tecno company is recognised for producing china made
phones but recently they have moved up in their product by stepping
up to producing mobile phones that run on android OS and are
relatively cheap hence if cost is one of the reasons you can not use
an android phone, cheer up pal because tecno has come to help as
the prices are relatively cheap compared to other android mobile
phone manufacturers.
The Tecno N7 is an awesome mobile phone device running on
Android 4.0.4 mobile OS and just so you know, rooting the device
will give you a higher privilege therefore you can tweak your device
absolutely to your own taste so let’s commence to the subject
matter.

How To Root Tecno N7

Before commencing on this process, I’d like to first make it clear to
you that rooting your tecno N7 will void its warranty(if yours comes
with one) and you will be solely held responsible for your actions. If
that is cool with you then let’s move ahead.
In other to move on with the tast of rooting the device, you will need
the following programs, SupperOneClick and Unlock Root
Downloader.
You can download SuperOneClick program here , and you can
download Unlock Root downloader program by clicking here.
Are you done with those?
Fine, install both applications on your computer and connect your
tecno N7 on a debuggin mode(this is very essential).
Don’t know How To Put Your Device On Debugging Mode?
From your menu on the mobile, simply go to settings » Developer »
Options » Debugging » USB Debugging and tap to enable it.
Upon inserting on your PC, your device drivers will be updated but if
that does not happen then launch the SuperOneClick Program and
you should get a prompt notification to install the drivers, click on
Yes. After successful installation, Disconnect and reconnect your
tecno N7 device and you won’t be required to install any drivers
again.
Next, on the superOneClick program, click on Root and allow the
software to root your tecno device, upon successful completion you
will be notified that your tecno n7 has been rooted hence you should
restart your tecno mobile phone device at this point.
Next, Launch the Unlock Root Downloader Program you had
downloaded and installed in the first step, click on Root and you
should get a warning that your Tecno N7 has been rooted, just
ignore the message and click on Proceed and after a while you
should get a notification that your tecno n7 has been successfully
rooted.
Now, disconnect the mobile device from the computer and download
root checker and superUser apps from Google Play Store, you can
download Root Checker Here and SuperUser here. The root checker
will help you confirm that your device as been properly rooted while
the SuperUser app will help you manage apps using SuperUser
privileges.
That’s it, you have successfully root your tecno N7 android device
hence you have full control over the device now, in my subsequent
posts I will be writing on how to root tecno N3 android mobile
device and more so if you do not want to miss that am sure you
know what to do .

Tecno D3 Root With Eroot & PdaNet

The Tecno F7 which is also known as Phantom A1 is no doubt one
awesome smartphone and currently stands out to be one of the
cheapest smartphones in the mobile market compared to other
smartphones with Same Specification and features. It seems most
People tend to be going in for this device hence I do like to share
with you how to root Tecno F7 (Phantom A1) using Eroot and
PdaNet programs so that you can gain root user access to your
device. More so, you can customize your smart phone mobile device
as you want once you can gain a root access on it.
How To Root Tecno F7 (Phantom A1) Using PdaNet And ERoot
Tecno F7
This tutorial is going to entail how to root your tecno F7 (Phantom
A1) mobile smartphone device using PdaNet and ERoot. Please
Note that the Tecno F7 has its bootloader locked hence in other to
root this device, you can either root through OneClick package or by
extracting the boot.img file and modify it to remove the security.
Did You Miss: Root Android Phone, Meaning, Advantages And
Disadvantages
Warning: Please Be Aware that the act of trying to
gain root access on your tecno F7 device is solely
your responsibility therefore, I will not be held
responsible if anything should go wrong during the
process but be sure that this trick works perfectly
fine if followed squarely.
Before engaging in our tutorial for rooting tecno F7, some certain
requirements needs to be put in place and I’d like to state them out.
Requirements Needed To Root Tecno F7
A Computer With Internet Connection
Android Debug Bridget(adb) Installed(You can download from
android developers).
Enable USB Debugging Mode(Very Important): You can do this by
navigating from the menu on your smart phone to settings »
Applications » Development » USB Debugging (Tap to enable).
Download ERoot File From here
Download Pda.net from here
Have you downloaded all those and get all requirements in place? If
No, please do and i will wait but if Yes, Good! Let’s move on.
Did You Miss, How To Root Tecno N7 Using SuperOneClick And
Unlock Root Downloader
Process In Rooting Tecno F7
Install the Pda.net file you downloaded earlier via the above link to
your computer and upon launching, you will be prompted for device
type, choose ‘Other ‘. You will then be asked to connect your tecno
F7 to the computer using USB Debugging Mode as described in the
requirements above.
Set tecno f7 on USB debugging mode
Extract The ERoot File you downloaded earlier via the above link
and run the eroot.exe file. Please ensure you have a working
internet connection on your computer to enable the eroot software
install a file of about 11MB. A Chinese language might be displayed
but do not worry, just ignore it and wait for a while, a root button
will then appear but if for any reasons it does not appear, exit the
Pda.net application running on your system tray and try again.
Click On the ‘ Root‘ button to root your Tecno F7 (Phantom A1),
then disconnect your Tecno F7 device from your PC. Navigate to the
menu on your device and you should see that SuperUser App has
been automatically installed.
Reboot your Tecno F7 and you can now enjoy your device to the
fullest because you have fully successfully rooted your device.
If you have any enquires, comments or contribution regarding how to
root your Tecno F7 (Phantom A1), you can please use the comment
form.

How To Root Tecno F7 Phantom A1 Using PdaNet And ERoot

The Tecno F7 which is also known as Phantom A1 is no doubt one
awesome smartphone and currently stands out to be one of the
cheapest smartphones in the mobile market compared to other
smartphones with Same Specification and features. It seems most
People tend to be going in for this device hence I do like to share
with you how to root Tecno F7 (Phantom A1) using Eroot and
PdaNet programs so that you can gain root user access to your
device. More so, you can customize your smart phone mobile device
as you want once you can gain a root access on it.
How To Root Tecno F7 (Phantom A1) Using PdaNet And ERoot
Tecno F7
This tutorial is going to entail how to root your tecno F7 (Phantom
A1) mobile smartphone device using PdaNet and ERoot. Please
Note that the Tecno F7 has its bootloader locked hence in other to
root this device, you can either root through OneClick package or by
extracting the boot.img file and modify it to remove the security.
Did You Miss: Root Android Phone, Meaning, Advantages And
Disadvantages
Warning: Please Be Aware that the act of trying to
gain root access on your tecno F7 device is solely
your responsibility therefore, I will not be held
responsible if anything should go wrong during the
process but be sure that this trick works perfectly
fine if followed squarely.
Before engaging in our tutorial for rooting tecno F7, some certain
requirements needs to be put in place and I’d like to state them out.
Requirements Needed To Root Tecno F7
A Computer With Internet Connection
Android Debug Bridget(adb) Installed(You can download from
android developers).
Enable USB Debugging Mode(Very Important): You can do this by
navigating from the menu on your smart phone to settings »
Applications » Development » USB Debugging (Tap to enable).
Download ERoot File From here
Download Pda.net from here
Have you downloaded all those and get all requirements in place? If
No, please do and i will wait but if Yes, Good! Let’s move on.
Did You Miss, How To Root Tecno N7 Using SuperOneClick And
Unlock Root Downloader
Process In Rooting Tecno F7
Install the Pda.net file you downloaded earlier via the above link to
your computer and upon launching, you will be prompted for device
type, choose ‘Other ‘. You will then be asked to connect your tecno
F7 to the computer using USB Debugging Mode as described in the
requirements above.
Set tecno f7 on USB debugging mode
Extract The ERoot File you downloaded earlier via the above link
and run the eroot.exe file. Please ensure you have a working
internet connection on your computer to enable the eroot software
install a file of about 11MB. A Chinese language might be displayed
but do not worry, just ignore it and wait for a while, a root button
will then appear but if for any reasons it does not appear, exit the
Pda.net application running on your system tray and try again.
Click On the ‘ Root‘ button to root your Tecno F7 (Phantom A1),
then disconnect your Tecno F7 device from your PC. Navigate to the
menu on your device and you should see that SuperUser App has
been automatically installed.
Reboot your Tecno F7 and you can now enjoy your device to the
fullest because you have fully successfully rooted your device.
If you have any enquires, comments or contribution regarding how to
root your Tecno F7 (Phantom A1), you can please use the comment
form.